Stamping In Savannah Presents

Surprise Pop-Up Bag in a Card
For this challenge, I was inspired by a design I found on Pinterest for a gift bag and a card combined. The bag could be used for a gift card or a piece of jewely, like earrings or necklace, or why not both!! Below the designs are the list of materials I used and a brief description on how to put the bag into the card. Enjoy!
#1 Magnet Closure


#2 with Belly Band


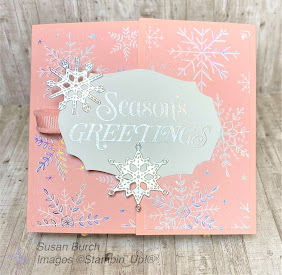
#3 Ribbon


Paper/Scoring Measurements:
DSP for pop-up gift bag: 4" x 9 1/2"
score on 4" side: 1" and 3 1/2"
score on 9 1/2" side: 1/2", 1", 4 1/2", 5", 5 1/2" and 9"
Cardbase: 4 1/2" x 11"
score on 11" side: 3 1/2" and 8 1/2"
DSP for front: 4 1/4" x 3 1/4 and 4 1/4" x 2 1/4"
DSP for inside 4 1/4" x 2 3/4"" and 4 1/4" x 2 1/4"
Basic White for inside 4 1/4" x 4 1/4"
Belly Band: 1 1/2" x 11 (optional)
Pop-Up Gift Bag: Trim the sections and notch as shown below


Apply Tear and Tape to the single tab side and secure to the opposite side.
Apply Tear and Tape to both sides of the of the bottoms (see below).

To adhere the bag to card, remove ONE SIDE ONLY of the Tear and Tape and place the bottom edge of bag at the card crease on the left side as shown below.
 Remove the tape from the other side and close the card over the tape. The bottom of the bag will adhere to the right side of the crease. When the card is opened the bag will pop-up!
Remove the tape from the other side and close the card over the tape. The bottom of the bag will adhere to the right side of the crease. When the card is opened the bag will pop-up!Add DSP to the outside and inside of card.
>Product List
")
")
 Specialty Designer Series Paper")


 Specialty Pack")


 Frayed Grosgrain Ribbon")
 Glittered Organdy Ribbon")


")


 Cotton Paper")
 Specialty Designer Series Paper")

